Christmas Ecommerce Best Practices [Part 3]

Welcome to the third article of our series about Ecommerce best practices for Christmas. In this series, we focus on providing recommendations on which digital marketing tools and practices to leverage for this holiday season. All our recommendations follow our P.A.C.E methodology which we use for our own digital marketing audits and digital roadmaps, and will be presented according to the four sections that make up our P.A.C.E model: Promote, Analyze, Convert and Engage.
In this week’s article about the Ecommerce best practices for Christmas, we will cover digital marketing recommendations that fall under the Convert section. Specifically, what tools and campaigns to use to improve the conversion rate from prospects to customers.
We have since then covered the additional sections of the P.A.C.E. model:
- Promote: Ecommerce Best Practices for Christmas [Part 1]
- Analyze: Ecommerce Best Practices for Christmas [Part 2]
- Engage: Ecommerce Best Practices for Christmas [Part 4]
-
Conduct A/B Testing Experiments
In the previous article of this series about the Analyze section of our P.A.C.E. model, we covered a way of identifying your website's pages with a high percentage of drop-offs, i.e. the pages where the highest number of visitors leave your website.
You now want to act on these pages in order to keep your visitors on the website. To do so, you need to experiment different variations of content, headlines and titles, visuals and even designs. The purpose of these variations is to identify which performs the best in retaining your visitors.One of the free tools available for A/B testing is actually included in Google Analytics, and is called Google Experiments. A pretty good presentation video has been uploaded on the Google Analytics Youtube channel:
Google Experiments however only supports A/B tests, and not multivariate tests, i.e. experiments that affect several items or several pages of the website. We won’t go over the multivariate testing in this series of articles, but if at least 25 people let us know in the commentary section, our Facebook, or Twitter pages that they would like to hear about it, we will cover the topic.
Other tools are available, and although they are subscription-based, they offer a lot more features. 3 of the most popular conversion testing tools are Convert, Optimizely and Visual Website Optimizer. All these tools offer a free trial or even a live test on your website, we encourage you to test them and determine which one has the smoothest integration with your website. It is also useful to note that some of these tools actually let you setup A/B tests without requiring the help of a designer or developer, you can simply edit your website in the tool as if you were using a WYSIWYG editor.
-
Setup a Remarketing campaign on the Display Network
One of the best ways to reach past visitors of your website who may have left without completing a conversion is to use remarketing. Remarketing serves ads to previous visitors as they browse websites that are part of Google Display Network, which “reaches 92% of all Internet users in the U.S.” according to Google. By staying visible, you encourage lost customers to buy from you and current customers to make additional purchases, which ultimately helps increasing the ROI of your Christmas campaigns.
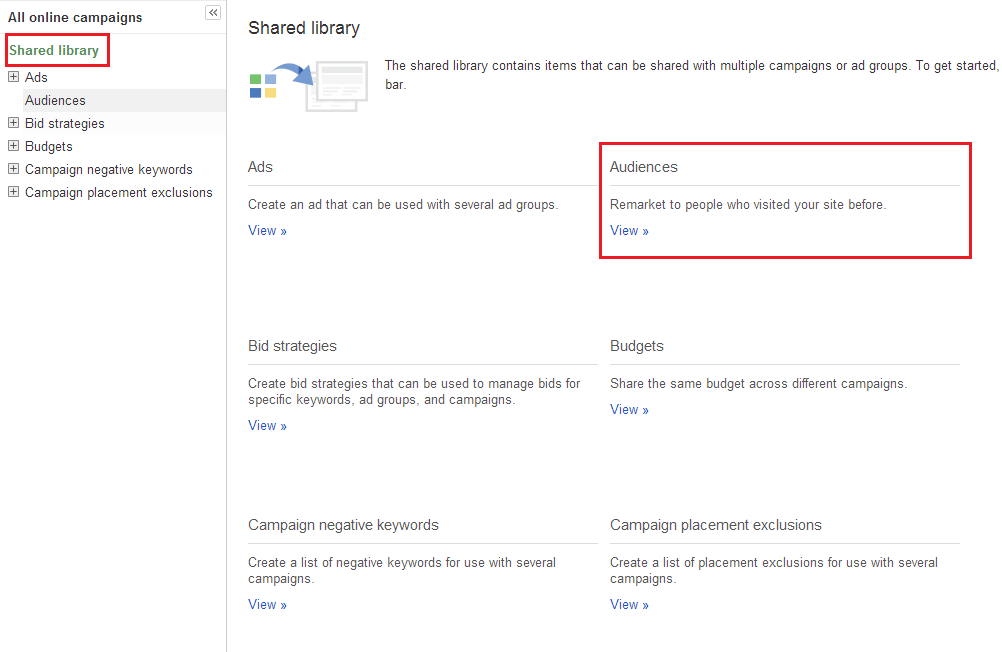
To setup a remarketing campaign in Google Adwords, start by creating a list of visitors you want to include in your campaign. To do so, go to Shared Library and click Audiences as seen below:
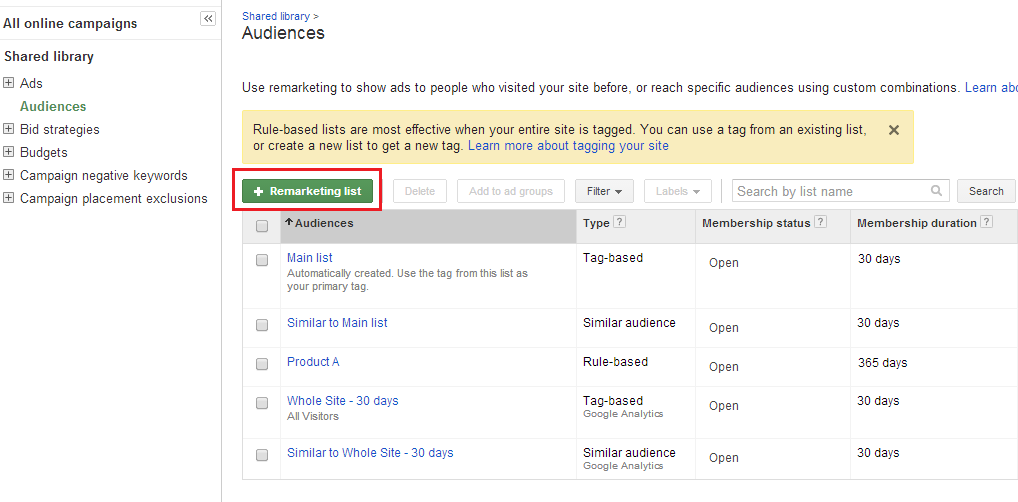
Then click “+ Remarketing list”:
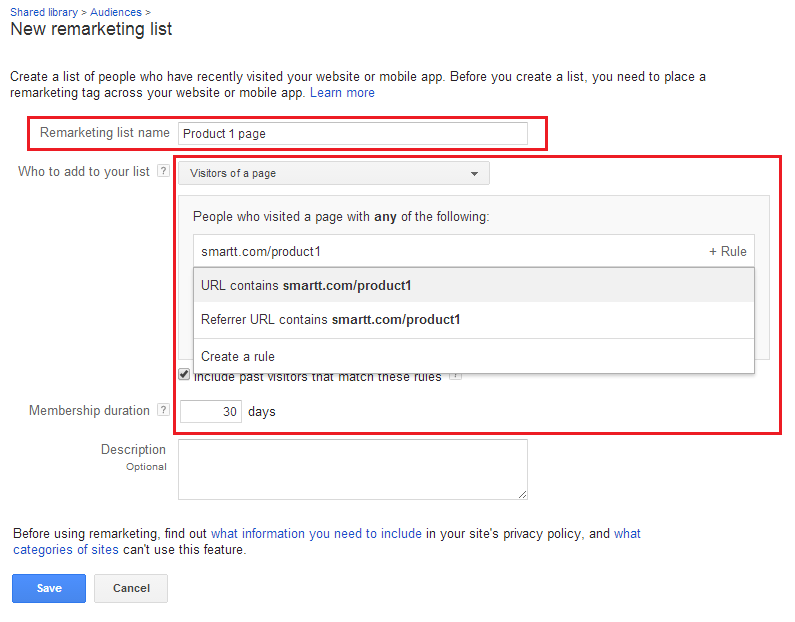
You now need to determine the conditions that match the list. In this example, we will use visitors of the page about product 1 in the last 30 days:
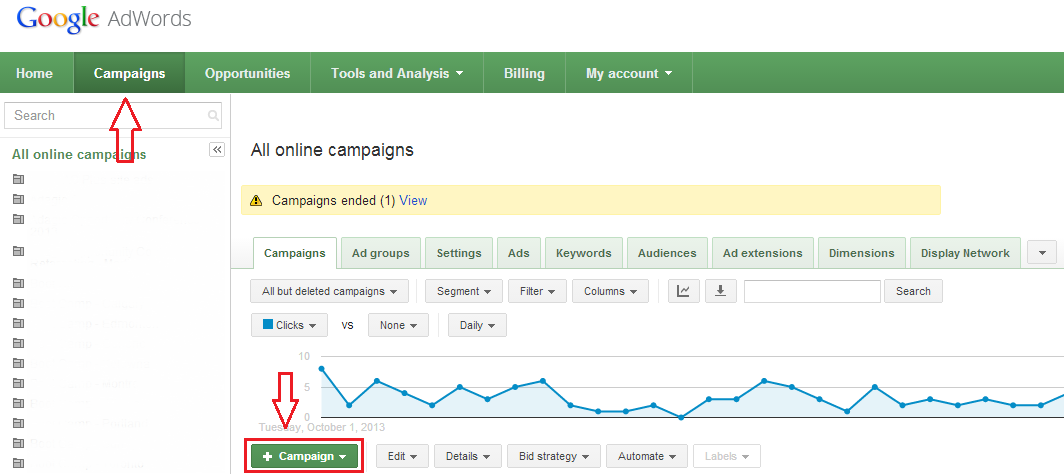
Keep in mind that if you use Google Merchant Center, Google will adapt the ads to the last products viewed, so you should probably target all your visitors and let Google do the work. To do so, simply select the “Whole Site – 30 days” list when setting up your campaign.To create your remarketing campaign, click “New Campaign” in the Campaigns tab as shown below:
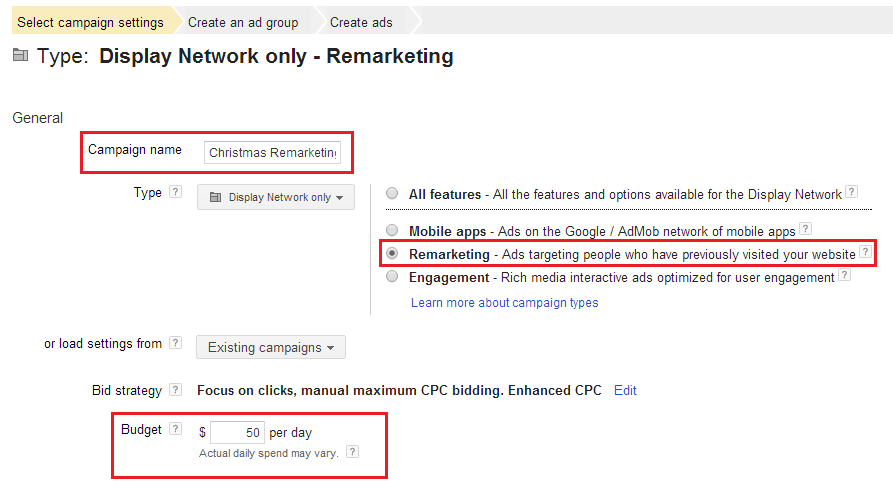
Select “Display Network only”, and click the remarketing button on the next screen. Enter the campaign name and daily budget as seen below:
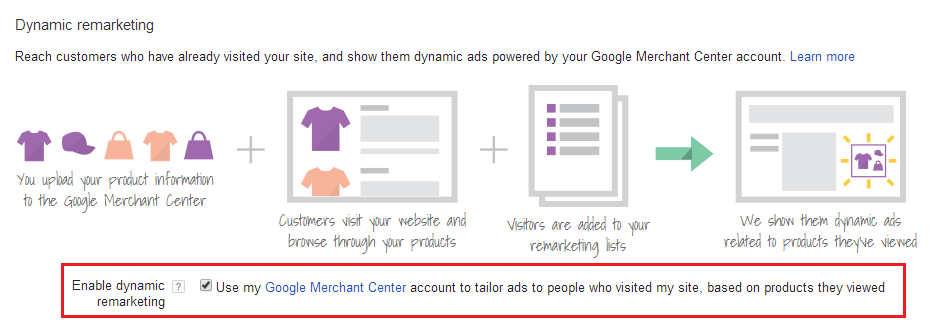
If you have a Google Merchant Center account, you can enable dynamic retargeting to serve ads based on the products that you visitors were looking at:
You then have the option to further tailor your advertisement to your customers by targeting certain locations, languages and devices, and to limit the display of your ads to certain hours and days.Because your ads will be displayed on the display network, you can even choose on which website your ads will appear. We highly recommend to select these placements manually, or at least to often go through the list of website placement if you are doing it automatically, to ensure your ads won’t be displayed on website that can be offensive and alter your brand image.
You can see below the different placement options for your remarketing campaign:
The different options are:
- Display keywords: choose keywords related to your products or services and Google selects relevant websites
- Placements: directly choose the website you want your ads to be displayed on
- Topics: choose groups of websites by theme, e.g. “Books & Literature” > “Book Retailers” if you think your audience is likely to visit book retailer websites
- Gender & Age: be careful with these placement options as only a small percentage of your visitors will actually have this information available
The Interest & remarketing is not covered as the campaign is already a remarketing campaign, and the interest correspond to the list you have defined, in my case the visitors of the page about product 1.
In addition to all these targeting options, we recommend setting up a frequency capping to limit the number of times your visitors will be exposed to your ads, as seeing the same ads over and over on different websites can sometimes cause website visitors to feel they are being "followed" by ads.
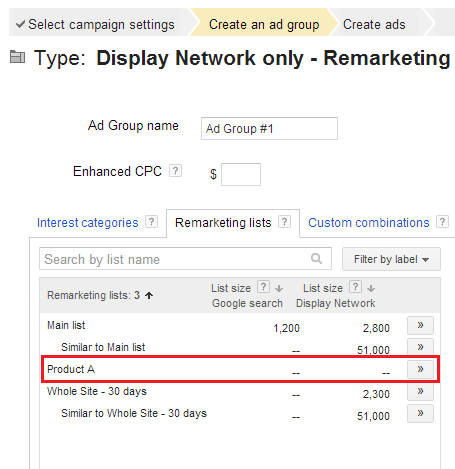
The next step is to select a list of visitors to include in your remarketing campaign. You can either target all your past visitors over the last 30 days for example, or choose to target only visitors of certain pages of your site. Select the lists you want to target in you remarketing campaign settings as seen below:
Finally, you need to create your ads. Google offers several options, such as uploading your own image ad, creating a text ad, or a display ad builder that lets you create display banners directly within Adwords. Note that your ad concept and design are critical to its success. Your ad needs to be aligned with the “big idea”, your company’s value proposition and the products or services you offer. Check out our Remarketing page to learn on how we can help you get the most out of behavioral remarketing.Below, the Adwords display banner builder:
Your remarketing campaign is now ready to be used. You can refer to Google support page for additional information on how to setup your campaign.
-
Setup a Remarketing Campaign on the Search Network
You also have the option of using a remarketing campaign on the search network, i.e. to target your search advertisements towards your past visitors. You might not want to actually limit all your ads to only your website visitors as you will likely miss on reaching new potential customers, but it can be a good way to focus some of your advertising budget on prospects that have already shown interest in your company and products. Experiment attributing a portion of your Adwords budget towards a search remarketing campaign and compare the ROIs.
To create a remarketing campaign on the search network, start by creating a new campaign in the Campaigns tab as previously seen for the display network. Select “Search Network only” this time. When selecting the campaign settings, use “All features” to be able to leverage all the options available on the search network.We won’t cover the additional settings such as keywords, devices, locations, languages and bids as each will be specific to your campaigns. But nonetheless, we recommend using ad extensions to provide additional valuable information that might increase the Click-Through rate, specifically the location, sitelinks and phone number. If you have a Google Merchant Center, you can also use product listing ads, refer to the first article of this series to get more details about the PLAs. You can also use the new review extension, which lets you display third party sources reviews in your ads. We already wrote a quick how-to guide on how to leverage the Adwords review extensions.
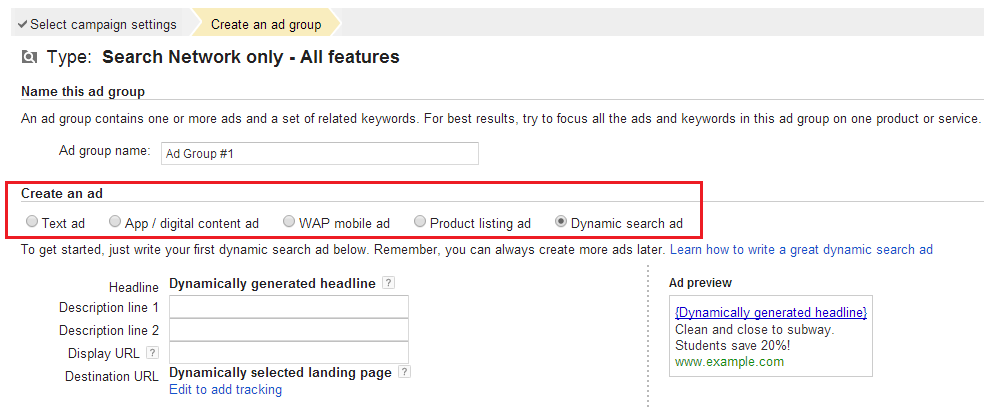
Once you have chosen all of your campaigns settings, create your ad groups and ads. Several options are available, such as Text ads, PLAs or Dynamic search ads that dynamically choose a headline and landing page as you can see below:
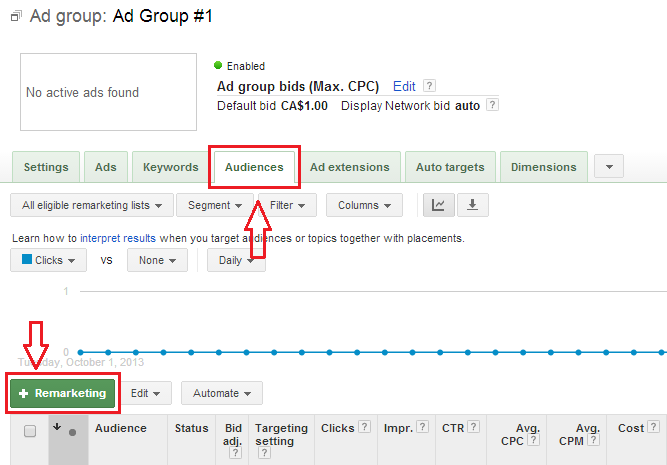
The next step is to select the audience you want to target with your search remarketing campaign. Select the Audiences tab and click on +Remarketing:
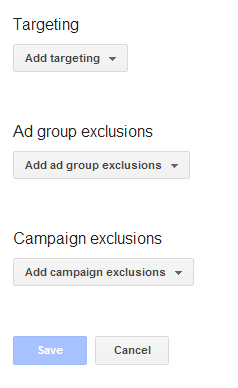
You then have the option of either targeting, or excluding some lists from that campaign:
Click Targeting > Add targeting > Remarketing and select the list to target, for example “Whole Site – 30 days” or a list that match specific conditions. Refer to the second section of this article for further details on lists.
-
Assess your Visuals’ Performance using Heatmapping
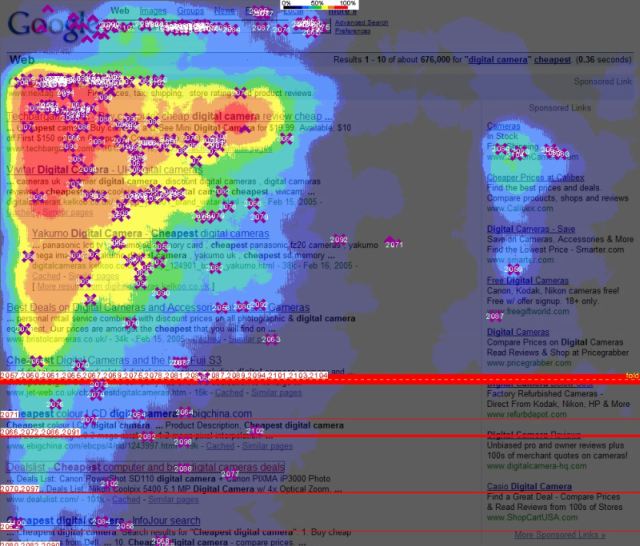
Heatmapping refers to the practice of tracking and visually mapping the behavior of your website visitors on each page. The heatmapping tools records the visitors’ mouse movements, clicks and scrolls to provide a representation of where the visitors attention is directed.
Below, an example of a heatmapping study on a Google search result page:
We highly encourage you to use a heatmapping tool all year long, especially if you are redesigning your website and want insights on how usable your current site is perceived by your visitors. It is also very helpful when conducting A/B test experiments.
That being said, you won’t have time to address major changes before Christmas, such as features or navigation, but you can still benefit from heatmapping. The earliest you install the tool, the more data you are going to gather, which will give more value to the insights provided. And even though you probably won’t have time to optimize important components of your website before Christmas, such as the payment gateway for example, you will still get valuable information about less technical items such as the visuals of your website. And this becomes even more important as the Christmas season (November-December) accounts for 23.5% of the full year retail ecommerce sales, according to a new report from eMarketer, reaching an all-time high of $61.8 billion this year, up by 15.1% compared to 2012.
So what type of insights can a heatmapping tool provide regarding your website’s visuals? It will assess the effectiveness of your images, banners and calls-to-action. If you observe a low density of mouse movement over a call-to-action, you can safely assume its design is not appealing and eye-catching enough to attract your visitors. You then have to come up with a variation, and let the experiment run using A/B testing until a winning variation is identified. By optimizing your images, banners and calls-to-action, you will retain more visitors on your website, and direct them more effectively to the pages you want them to browse.
As a reference, two of the most popular heatmapping tools are Crazy Egg and ClickTale, each offers a free trial, which we encourage you to use. Crazy Egg has published a good explicative video on the functionality of its tool:
If you follow these recommendations and combine them with your other digital marketing activities as covered in our P.A.C.E model, you will see measurable improvements in your Christmas campaign.
This concludes our third article of our series on the Ecommerce best practices for Christmas. Don’t forget to check the three additional sections of the P.A.C.E. model:
- Promote: Ecommerce Best Practices for Christmas [Part 1]
- Analyze: Ecommerce Best Practices for Christmas [Part 2]
- Engage: Ecommerce Best Practices for Christmas [Part 4]
If you want to hear more about these recommendations or get information on how we can help you with your Christmas campaign, get in touch with us through our contact page.
In the meantime, we would love to hear about what practices you plan on using for Christmas, in the comment section below, or on our Facebook and Twitter pages.

.PNG)
